|
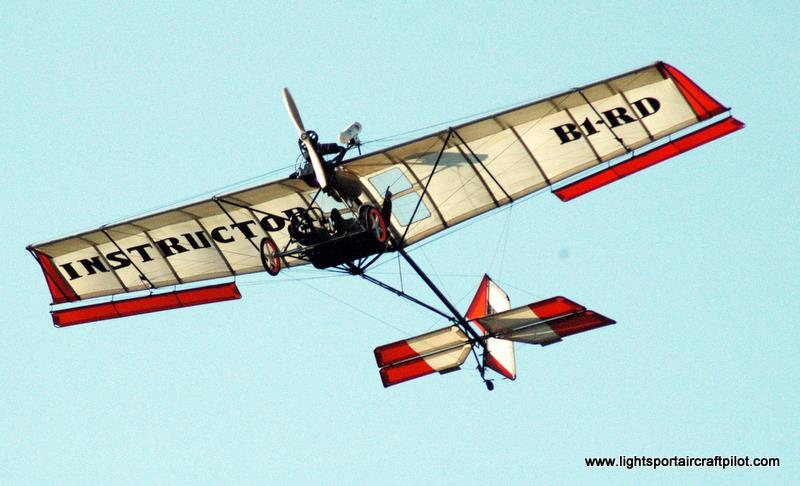
B1-RD
ultralight specifications |
|
Empty Weight: |
220 lbs. |
|
Gross Weight: |
500 lbs. |
|
Wing Span: |
32 ft. |
|
Wing Area: |
162 sq ft. |
|
Engine:
|
430 Cayuna |
|
Cruise Speed: |
38 mph |
|
Stall Speed: |
15 mph. |
|
VNE: |
50 mph. |
|
Construction: |
aluminum tube and
fabric |
|
Building time: |
|
For additional
information check out:
http://hometown.aol.com/skyking366/index.html |
With that in mind we're going to run
through a quick guide to proper inspection.
An annual inspection implies a yearly look over of the
airframe. What it really means is a thorough inspection and
tear down to determine if the aircraft is still in
airworthy condition. It is not a pre-flight, in that you
look at all the operational systems to assure proper
function and integrity. It is a deliberate attempt to find
fault with the craft and to repair anything that is less
than perfect.
Don't attempt to perform this operation in one afternoon
with the aircraft out on the grass. I done right you will
inevitably find something that needs replacing, even if it's
just a bolt, and you won't have it. Find a nice dry hanger
you can use for a couple of days and take your time.
This checklist is intended as a guide only and is not
intended to be all-inclusive. It is your responsibility
tomake sure everything is looked at and that the aircraft is
completely airworthy.
Note Inspection of any assembly not plainly visible will
require some disassembly. Any part of bolt not easily seen
with a flashlight must be exposed for proper inspection.
B1-RD ANNUAL INSPECTION GUIDELINE
Robertson B1RD
FLIGHT CONTROLS
1. Control Stick - Remove and inspect control stick
assembly. Check for bent bellcranks and worn rod ends.
2. Aileron Control Cables - Inspect for fraying, kinks
and wear.
3. Rudder Control Cables - Inspect for fraying, kinks and
wear. 2-place B1-RDs should have new heavy-duty cables
installed.
NOTE: Do not wash internal lubricant from control
cables.
4. Elevator Push Rod - Inspect for straightness, wear,
cracks and security of the rod ends.
5. Rudder Pedals - Check for binding and security of the
return springs.
6. Ailerons - Inspect for security of hinge points,
structural integrity, and loose fasteners. Lubricate hinge
points.
7. Elevator - Inspect for security of hinge points,
structural integrity, and loose fasteners. Lubricate hinge
points.
8. Rudder - Inspect for security of hinge points,
structural integrity, and loose fasteners. Lubricate hinge
points.
9. Rigging (flight controls) - Inspect all control cable
installations for binding, wear spots or mis-alignment.
Robertson B1RD
FLYING WIRES
1. Cables - Inspect all flying wires for frayed spots,
kinks, or damaged sections. Cable should exit swagged on
fittings cleanly, with no kinks or loose wires visible. Its
possible the able coating may not reach all the way to the
fitting. This is not usually a concern as the coating
sometimes shrinks with age and will pull away from the
fitting.
2. Turnbuckles - Inspect for correct thread engagement,
corrosion and proper safety wiring
3. Cable Attach Tangs - Check for cracks or elongation.
Inspect all clevis pin and cotter pin installations.
Replace any rusty cotter pins.
4. Rigging - Inspect for proper cable tension. Aircraft
will usually need a thorough re-rig at the conclusion of the
annual. See B1-RD Droppings #2 for rigging hints.
Robertson B1RD
SAILS
1. Sail Surfaces - Inspect for fabric deterioration,
loose stitching and evidence of damage. Signs of sail
deterioration begin at the highly stressed areas such as the
tensioning grommets at the corners of the sail. If these
stress points are tearing out and the color is noticeably
faded you can consider the sail as ready to replace. We are
currently working on a sail strength test kit that should
take the guesswork out. Call for info.
2. Battens - Inspect for damage and general contour.
Battens should be matched side for side, and should be
over-curved slightly at their forward 30% for added sail
tension. Make sure the battens haven't chafed through their
pockets into the spars.
3. Control Surfaces - Check general fit and condition of
sail. Tail surfaces must be as tight as possible for proper
aircraft performance.
Robertson B1RD
LANDING GEAR
1. Wheels and Tires - Check for damage and proper
inflation.
2. Wheel Bearings - Check for wear and lubrication. The
best lube for nylon wheel bearings we've found is anti-seize
compound usually used on auto exhaust system fasteners.
Ball bearing wheel bearings should be available by the time
you read this.
3. Swing Arms - Inspect for wear and damage. Bent swing
arms can usually be straightened if the bend is mild.
Lubricate hinge point.
4. Bungee Cord - Inspect for damage, rot and even
tension. Correct tension gives movement when rolling over
irregularities but not when pilot sits in machine.
5. Main Axle Assembly - Inspect for bends, cracks, hole
elongation, corrosion or other evidence of damage. Inspect
security of all weldments.
Robertson B1RD
AIRCRAFT STRUCTURE
1. Wings - Inspect tubs and attach channels for cracks,
dents, bends, abrasions, corrosion, hole elongation or any
other sign of damage. Inspect all fasteners for distortion,
rust and integrity.
NOTE: Tubes sealed with end caps (even if only on one
end) tend to hold moisture and accelerate fastener
corrosion. Throw the end caps away and remove and inspect
any fastener that you cannot see directly.
2. Fuselage and Keel - Inspect tubes, fittings, and
attach channels for cracks, bends, corrosion, finish, hole
elongation and evidence of any other damage. Inspect all
fasteners for distortion and security.
3. Tail Section - Inspect tubes, brackets, and attach
channels for cracks, bends, corrosion, finish, hole
elongation, and evidence of any other damage. Inspect all
fasteners for distortion and security.
4. Harness System - Inspect for damage or cracking.
Inspect attach hardware for integrity. Clean only with mild
soap and water. Wax the latch parts to eliminate rust.
5. Seat Assembly - Inspect for damage or cracking.
Inspect attach hardware for integrity.
Robertson B1RD
POWER PLANT
1. Propeller - Remove and inspect for cracks,
delamination, warpage and hole elongation. Refinish and
rebalance according to condition. Your propeller should
last a lifetime if properly maintained. We recommend
leading edge protection tape for erosion resistance and
longest life. Call for information.
2. Drive Belts - Inspect for wear, fraying and glazing.
3. Large Drive Pulley - Remove system and inspect
condition of front and rear bearings, shaft alignment and
straightness. Make sure shaft is a press fit in both
bearings. Check pulley groves for wear, damage and glazing.
NOTE: IF A POWER ON PROP STOPPAGE HAS OCCURRED FOR
ANY REASON, OR IF THE PROP WAS DAMAGED WHILE BOLTED TO THE
AIRCRAFT, IT IS HIGHLY RECOMMENDED THAT THE PROPELLER SHAFT
BE EITHER MAGNIFLUX INSPECTED BY AN INSPECTION CENTER OR
REPLACES. THESE SHAFTS HAVE FAILED WHEN ABUSED. DON'T
NEGLECT THIS PRECAUTION.
4. Small Drive Pulley - Inspect for damage and wear.
Re-torque (50 ft.lbs.) the retainer bolt and safety wire.
5. Motor Mounts - Disassemble and inspect for cracks,
hole elongation, fastener distortion and security. Inspect
Lord Mounts for deterioration and cracks. Eliminate any
parts mis-match or hole mis-alignments during re-assembly by
pass drilling questionable holes. Be sure that the prop
shaft is notched and the safety bolt has been installed
through the eccentric shaft per safety bulletin #7.
6. Fuel Tank - Remove and inspect for cracks, worn spots,
security of hose fittings and internal contamination.
Replace tank cap gasket if the old one is crumbly and the
fuel line if yellowed and hard. Replace fuel filter.
7. Fuel Pump - Inspect for damage. Air blown gently
through pump should flow only in direction of arrows. The
center tap should be sealed internally. Do not use
compressed air to blow through the pump.
8. Air Filter - Remove, inspect, clean and re-oil.
9. Muffler and Exhaust System - remove, clean and inspect
for cracks, leaks, broken welds, and loose internal
baffles. Tap the muffler body against a wooden object and
listen for internal rattles that indicate loose internal
parts. Replace grommets and springs if worn. Use high temp
(orange) silicone seal on muffler junctions to minimize
leakage.
NOTE: It is our experience that most Cuyuna 430 R
engines mounted on a stock B1-RD with a stock Cuyuna Muffler
(5"x18" with vertical exhaust outlet and double ball and
socket inlet) will not run consistently or with any
linearity. If your unit is stock and is still refusing to
"tune", the only in-expensive cure is an exhaust system
change. Some older Fischer systems are still around and
work well. The only fix left now is our Rotax Muffler
Conversion Kit, which in reality makes the Cuyuna run very
much like a Rotax.
10. Throttle Control - Inspect cable and housing for
fraying, kinks, abrasion and routing. Pay particular
attention to the end stop that pulls on the throttle slide.
The throttle should move smoothly throughout its travel.
NOTE: an adjustable non-slip one piece throttle cable is
available for all B1-RDs. If your original Cable won't stay
adjusted, this is for you.
11. Engine - Refer to your engine manual for detail
information.
A. Remove exhaust manifold and inspect pistons and
cylinder walls for scratches or galling. Inspect the rings
and determine that they are free to move in their grooves.
If there is heavy carbon build up on the piston crown,
remove the cylinder heads and de-carbon the engine per the
engine manual.
B. Pressure check the crankcase and inspect for leaks.
C. Remove recoil starter and inspect ignition points for
dirt, proper operation and timing. Make sure the condensers
are properly seated. A drop of "super glue" to "safety" the
condensers in is recommended. The have been known to fall
out.
D. Inspect and adjust the fan belt.
E. Inspect the recoil starter rope ends for fraying and
wax the rope with bee's wax and re-install.
F. Re-torque the head and crankcase nuts.
G. Inspect and clean all cooling fins.
H. Replace the spark plugs. (Gap .015-.020 for magnetos
- .035 for CDI units).
12. Carburetor - Inspect for integrity. Remove bowl and
check for contamination. If dirty, disassemble and clean
entire carburetor. Inspect the rubber carburetor mounting
flange for cracks.
That's about it for our outline. Remember, when inspecting
your aircraft, the golden rule is thoroughness. If in
doubt, tear it apart and look. If a part is less than
perfect, replace it. Your life depends on it. No aircraft
we have inspected was perfect.
Believe it or not, no matter how well you maintain your
machine,
IF YOU DON'T FIND SOMETHING
WRONG YOU HAVE NOT LOOKED HARD ENOUGH. |
|
Light Sport Aircraft Pilot News Web Magazine.
You may link to these pages or print
them out for your own personal use.
No part of this
publication may be copied or distributed, transmitted, transcribed,
stored in a retrieval system, or translated into any human or computer
language, in any form or by any means, electronic, mechanical,
manual, or otherwise, without the written permission of Light Sport
Aircraft Pilot News.
By copying or paraphrasing the intellectual
property on this site, you're automatically signing a binding contract
and agreeing to be billed $10,000 payable immediately. Copyright Light Sport Aircraft
Pilot News. Email
|